- Tutorials
- 27 August
How Old Is My Photo?
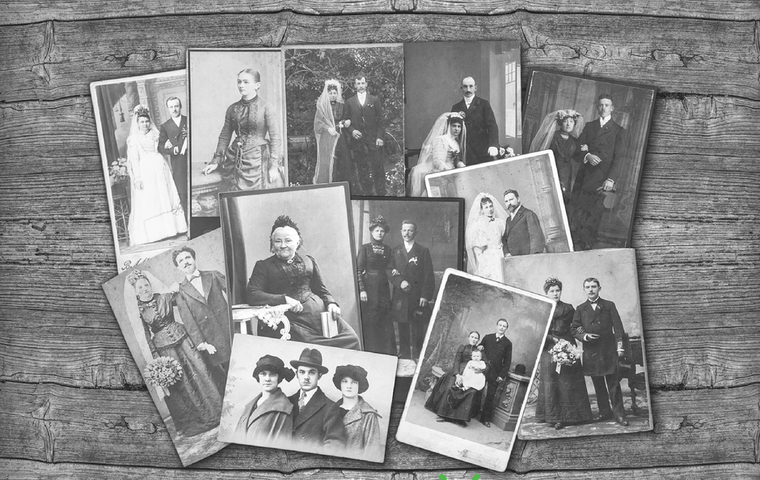
In a perfect genealogy world every photograph you inherited would be labeled with the date, location, and the names of its subjects. They would be archived in protective coverings and there would be hardly any wear, tear, or damage. There would be so much information that it would be easy to track down your ancestors personal histories, records, and stories. Wouldn’t that just be perfect!? Those of us who love genealogy can dream right!?
The sad truth is that most passed down photographs contain little info, if any, and are usually damaged as well. Restore.tv can definitely help with damage control and restore photographs back to their original glory, but we thought we might also be able to offer some tips on how to find more information re: your genealogical find!
In this article we will be going over ways that can help determine how old your photograph is. Once you are armed with that information other puzzle pieces will be able to fall in place!
It’s All in the Details!
Take a close look at the photograph, now take even a closer look! The details within can tell you when it was taken. Below are the most reliable and useful time markers we take into account when trying to date a photograph.
First Look at the Photographic Technique

The first photograph was successfully taken in 1820 and as time passed many techniques were used over the years to quicken the production and better the quality of creating an image. Here are some of the most used photographic techniques that were popular in the 19th and 20th centuries.
- Daguerreotype – Introduced by Louis Daguerre, this technique was widely used in the 1840s and 1850’s. Typically a Daguerreotype can be characterized by it being processed on a thin sheet of metal material, most always a highly polished silver plate and usually housed in a small, decorative case. By the 1860s this technique was abandoned for other processes that were less expensive and easier to produce.
- Tintype – Widely used in the 1860s and 1870s this technique was similar and often confused as a Daguerrotype but it differed in that the iron sheet was very resilient and didn’t need a drying time. This allowed photographers to get out of their studio and out on to the streets. A lot of tintypes were captured as photographers set up shop at carnivals, fairs and even on the sidewalk. This technique is still used today and is seen as quite the novelty.
- Carte-de-visite – These highly produced photographs were quite the thing back in their day. Carte-de-visite’s were invented in 1854 but reached their peak during the late 1880s and 1890s in what was known as “Cardomania”. These photographs are easily distinguished by the size and material in which they were mounted on, a cardboard back measuring 2″x3″.
- Cabinet Card – Very similar to the Carte-de-visite technique but can be easily distinguished by the fact that it was mounted on a larger cardboard back. Usually 4.5″x6.5″.
- Photo Postcard – Very popular in the early 1900’s these photographs were usually printed on heavy paper and were sent as a postcard. Most often you can still see a postmark on them.
- Home Photography – With the invention of Kodak’s “Brownie” in early 1900, consumers could now take snapshots of their immediate surroundings. These photos usually have a less posed, more fluid look about them and show an amateur approach in their developing.
Now Let’s Look at Women’s Fashion

One of the easiest ways to date a photograph is to look at how the ladies are styled! Although men and children styles also changed through out the 19th and 20th centuries, women’s fashions made the most dramatic changes during each decade. Also look at the coloring of the dresses which may determine what season the photograph was taken. Darker fabrics were traditionally worn more in the winter months and lighter colors in the summer.
- 1850s & 1860s – Simple hair and jewelry, very wide, bell shaped skirts in rich, heavy fabrics, modest embellishments and necklines.
- 1870s – A more European approach in dress, narrow silhouette, bustles, square necklines, tight sleeves and gloves.
- 1880s – Heavily corseted, larger bustles, long trains, jeweled collars and choker necklaces or ribbons.
- 1890s – Corset fashion continues but silhouettes begin to relax and become more simple, women’s sportswear was introduced with the tennis dress and bicycling dress (bloomers!)
- 1900s & 1910s – Elegant but more loose fitting, blouses and skirt combinations instead of just dresses, large hats with evening wear.
- 1920s – Straight lines, simple, shorter hemlines, light fabric, bobbed hair.
Finally Take in the Surroundings
Besides the people photographed what else is in the background. Look for historical landmarks, automobiles, technology, etc. If a couple is seated on a lawn and a building is behind them try searching for the building, i.e. if it was built in 1920 that gives you a pretty secure timeline to start at. If the photo has an inscription on the back “Dad’s new car!” find a auto magazine online to identify the make, model and year. Also look at furniture, work equipment, and architecture design. Get out a magnifying glass and check to see if there’s printed material, a book or a newspaper title can help date things as well.
Combining these clues can help you narrow down dates and locations. Cross-reference this information with any family history you have on hand and you are on your way to getting the complete picture! One of the funnest things about genealogy, finding old records and coming upon family photographs is solving the mystery! So have fun and good luck!
Restore.tv truly believes that our photographic histories are so important in continuing each families story. If you would like more information on photo restorations, creating a picture story, and preserving your families memories click here or give us a call!
Andrea
Recent Blog Posts


FAMILY TRADITIONS 🎄🎁@ RESTORE.TV
27 December